Automating iOS App Store screenshots
This originated from a short talk about screenshot automation that I gave at the Boston CocoaHeads in January. My initial goal of the talk was to just show that it was possible to do such a thing and encourage others to consider automating their own processes, but there was some interest in a more detailed write-up. Here it is. Also, thanks to Daniel Jalkut for his blog post that stirred up some more interest.
What does this look like?
First off, what am I talking about? Here's a video of Fantastical's screenshot automation, which shows the complete process in action.
Why do I want to do this?
Because you're lazy. Why take screenshots manually when your computer can do it for you? For one, consider the math. Let's say you have 5 screenshots for the App Store, for 5 languages. Oh yeah, you also have a 3.5 inch and a 4 inch screen. Maybe an iPad too. That's 5 x 5 x 2 (or 3) screenshots to take. At 30 seconds a screenshot, that's 25 (or 37.5) minutes just to take the screenshots. Don't make any mistakes, otherwise it'll take even longer. This probably isn't a one time deal either, unless you never plan on changing your app again. Trust me, this is worth taking a couple of hours to add to your app. As you'll see, I've even done some of the work for you.
OK, show me an example
First, grab the source from KSScreenshotManager at GitHub. Be sure you clone the WaxSim submodule, otherwise the included script won't work. For those of you who aren't familiar with submodules, the command you're looking for is git submodule update --init. If you want to include this in your own project, add KSScreenshotManager as a submodule and add KSScreenshotManager and KSScreenshotAction to your project.
Safety first
Be aware that we'll be using private API to get the job done. This doesn't matter since this code isn't going to the App Store, but take care that you don't let private API declarations or usage slip into your shipping builds. You'll notice that the example uses the macro CREATING_SCREENSHOTS to ensure that none of the screenshot code is included in normal builds.
Defining your screenshots
Digging into the sample code, KSScreenshotManager and the MyScreenshotManager subclass are what we're interested in. This is where we specify what we actually want to take screenshots of in our app. In our example we're going to take two screenshots of a table view.
Our first action scrolls the table view to the second row. Once actionBlock is called, KSScreenshotManager will take a screenshot and crop out the status bar.
KSScreenshotAction *synchronousAction = [KSScreenshotAction actionWithName:@"tableView1" asynchronous:NO actionBlock:^{
    NSIndexPath *indexPath = [NSIndexPath indexPathForRow:2 inSection:0];

    [[[self tableViewController] tableView] scrollToRowAtIndexPath:indexPath atScrollPosition:UITableViewScrollPositionTop animated:NO];
} cleanupBlock:^{
    [[[self tableViewController] tableView] setContentOffset:CGPointZero];
}];

[self addScreenshotAction:synchronousAction];
The next action is similar, but this time asynchronous is YES. This allows us to perform actions that take time to complete. Once the screenshot is ready, call [self actionIsReady]. This will take the screenshot and continue to the next action. Here we're just changing the device orientation, but you might need to wait for other reasons, such as animations or network activity.
KSScreenshotAction *asynchronousAction = [KSScreenshotAction actionWithName:@"tableView2" asynchronous:YES actionBlock:^{
    NSIndexPath *indexPath = [NSIndexPath indexPathForRow:8 inSection:0];

    [[[self tableViewController] tableView] scrollToRowAtIndexPath:indexPath atScrollPosition:UITableViewScrollPositionTop animated:NO];

    [[UIDevice currentDevice] setOrientation:UIInterfaceOrientationLandscapeLeft]; //programmatically switch to landscape (private API)

    dispatch_time_t popTime = dispatch_time(DISPATCH_TIME_NOW, (int64_t)(2.0 * NSEC_PER_SEC));
    dispatch_after(popTime, dispatch_get_main_queue(), ^(void){
        [self actionIsReady];
    });
} cleanupBlock:nil];
Once the actions are created, we need to actually create the screenshots. We do that in -[AppDelegate application:didFinishLaunchingWithOptions:]:
dispatch_time_t popTime = dispatch_time(DISPATCH_TIME_NOW, (int64_t)(2.0 * NSEC_PER_SEC));
dispatch_after(popTime, dispatch_get_main_queue(), ^(void){
    MyScreenshotManager *screenshotManager = [[MyScreenshotManager alloc] init];

    [screenshotManager setTableViewController:viewController];
    [screenshotManager takeScreenshots];
});
Driving the simulator
So we have the screenshot actions set up, but we still have to manually change the project target and run the app in the simulator. Fortunately we can automate this too, thanks to WaxSim. Using make_screenshots.py we can generate screenshots for any combination of devices and languages. The version of make_screenshots.py included with the sample code runs for the 3.5 inch and 4 inch iPhone in English and German, for a total of 4 runs. You'll need to change the variables in make_screenshots.py to make it work with your own project.
After running python make_screenshots.py ~/Desktop/screenshots in the Terminal, we have a fresh set of screenshots:
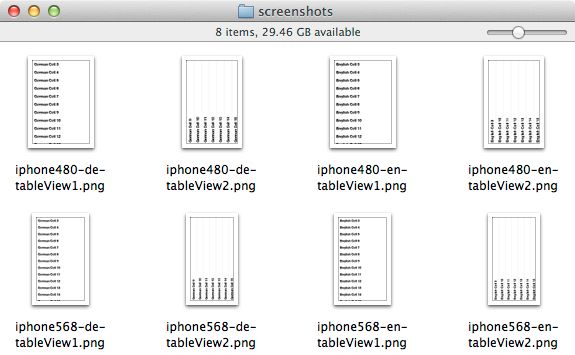
That's all there is to it! Any time you need screenshots, just run that script again and wait about a minute. For bonus points you can hook this up to your continuous integration server so you always have up-to-date screenshots.
Getting fancier
What you've just seen is enough to automate screenshots in your own app. However, it can be tricky to get your app just into the right state to make a screenshot. For example, Fantastical's screenshots had to have the exact same set of events and be running on a certain date. This took a bit more than just displaying view controllers and adjusting views. Here's some additional details on what I did to get Fantastical's screenshot process running smoothly. These won't apply to every app directly, but hopefully it'll provide some ideas.
Faking the date and time
The pesky thing about time is it won't stay still. Not so helpful for screenshots of time-sensitive material such as calendars. Fortunately it's easy enough to fake the date throughout an application without actually changing any code. Method swizzling to the rescue!
#import <objc/runtime.h>

@implementation NSDate (ScreenshotSwizzle)

+ (void)load
{
    SEL originalSelector = @selector(date);
    SEL newSelector = @selector(screenshot_date);
    Method origMethod = class_getClassMethod(self, originalSelector);
    Method newMethod = class_getClassMethod(self, newSelector);

    method_exchangeImplementations(origMethod, newMethod);
}

+ (id)screenshot_date
{
    //Today is November 14, 2012
    return [self dateWithTimeIntervalSince1970:1352894400];
}

@end
Now the entire app thinks it is November 14 all the time. If you find yourself thinking "I wish I could change what this method does everywhere in the app," think swizzling.
Abusing private API
There are all kinds of extra goodies available since this code isn't going to the App Store. In the example above, I used the private -[UIDevice setOrientation:] to force the simulator into a difference orientation. In Fantastical, private API ended up being useful for setting up consistent calendar data. Rather than creating the events by hand using EventKit's public API, class-dump revealed that EKEventStore had methods to load ics files already lurking in it. One private method later, I had events getting loaded from an ics file:
@interface EKEventStore ()
- (id)importICSData:(id)arg1 intoCalendar:(id)arg2 options:(unsigned int)arg3;
@end

NSData *icsData = [NSData dataWithContentsOfURL:[[NSBundle mainBundle] URLForResource:@"Home" withExtension:@"ics"]];
NSArray *events = [[self eventStore] importICSData:icsData intoCalendar:calendar options:0];
This made it possible to create the events using a more sensible application and then feed the ics data straight into EventKit. Little things like this give even more time savings that you might not think of if you're taking screenshots by hand. Again, take care to ensure you don't let any private API leak into your App Store code.
Loading network data
Rapidly-changing network data can be problematic when you're trying to make that perfect set of screenshots. While this wasn't necessarily in Fantastical, using a mock object such as Mocktail could make life a lot easier. (Disclaimer: I've never used Mocktail myself, but it looks handy.)
Other options
Prefer using the UI Automation instrument? UI Screen Shooter may be of interest to you. I'm partial to my approach since I needed the additional control of setting NSUserDefaults based on locale, swizzling NSDate and loading specific calendar data on each launch. However, UI Automation may be more appropriate in some situations.
Wrapping up
Get the code for KSScreenshotManager at GitHub. As you've seen, you won't be able to drop this code in and magically have automated screenshots in your own app. You still need to get your app into the right state to take the screenshots. The good news is that you only have to do it once. Happy automating!